How to Check In on Facebook from Mobile & Desktop
Facebook check-in is the quickest way to share your whereabouts with your social network. It is not just letting others know where you are. Check-ins help you document moments, stay connected with loved ones, and even coordinate meetups.
But despite being such a simple feature, many users still aren’t sure where the Check-In button is. This guide breaks down everything clearly, including how to check in on mobile and from a desktop. Let’s start!

Part 1: What Is a Facebook Check-In
A Facebook check-in is a location-tagged post that shows where you are at the moment of posting. It can be a cafe, hotel, airport, museum, or a general city or town. When you check in somewhere, Facebook attaches a precise location tag to your post. Your friends and Facebook audience can see where you are.
People use check-ins for different reasons:
- To share travel updates.
- For documenting visits to restaurants, events, and tourist spots.
- To let family know you have reached a destination safely.
- To coordinate with multiple people.
- To keep a digital map of places they have been.
But like every location-based feature, check-ins can also be used since many people beyond your close circle will see your check-in, depending on your privacy settings. So it’s important to use this feature wisely, especially when posting real-time locations.
Facebook Places
Facebook Places is the system behind Facebook’s location tagging. It uses GPS, Wi-Fi signals, mobile networks, and Facebook’s own database of venues to determine where you are.
Places serve three major functions:
- Finding Nearby Locations: Facebook shows a list of places around you, which includes restaurants, shops, parks, and event venues based on your real-time location.
- Add New Locations: If the place you are visiting is not listed, you can create a new venue.
- Helping Friends Find You: Your check-in appears in your friends’ feeds. Letting them know your current or recent location.
Places works best on mobile because it relies heavily on GPS, but it’s also accessible via desktop when you create a location-tagged post.
Part 2: How to Check In on Facebook [Mobile & Desktop]
Checking in on Facebook is extremely simple, but the steps differ slightly depending if you are using the Facebook mobile app or a computer.
How to Check In on Facebook (Android & iPhone)
The Facebook check-ins are quick and effortless. Here’s how:
Step 1: Open the Facebook app on your Android or iPhone.
Step 2: On the Home screen, tap on the “+” icon to create a post. You will usually see a “Check In” option inside the “Create Post” area. Tap on it.

Step 3: A list of nearby places appears automatically. Tap the correct location. Or you can use the search bar if the place isn’t listed. Or tap “Add a New Place” if the location doesn’t exist in Facebook’s database.
Step 4: Facebook lets you add details. You can write a caption, add photos, tag friends, and select your audience (Public, Friends, Only Me)
Step 5: Tap on “Post”, and your check-in goes live instantly.
How to Check In on Facebook (Desktop)
If you’re browsing Facebook from your laptop or computer, you can still check in, though it relies more on your IP address or manually typed location.
Step 1: Log in to your Facebook account and go to your News Feed.
Step 2: Click on the menu button. This will open the Create Post window.

Step 3: Click the “Check In” Map Pin Icon. If you don’t see it immediately, click the three dots (…) to open more options.
![]()
Step 4: Search for Your Location. Type the place name and select it.
Step 5: Write your post and hit “Share.” You can add photos, tag friends, or write a caption before posting.
Part 3: Change Your Location for Facebook Check-Ins Using MocPOGO
Sometimes Facebook fails to detect your real location. You just want to appear somewhere else for privacy, content creation, or checking in at a place you’re planning to visit. MocPOGO, a trusted location changer, can become incredibly helpful in this situation. MocPOGO lets you instantly teleport your GPS position to anywhere in the world, and Facebook automatically uses that new location when you check in.
MocPOGO Location Spoofer helps with Facebook check-ins in many ways:
168,282 people have downloaded it.
- When Facebook does not show accurate GPS data.
- It helps you if you want to check in from another city while planning a trip.
- If the areas have a poor signal, it prevents Facebook from detecting your location.
- You want privacy while still sharing a location-based story.
- Creators mostly use virtual locations for storytelling or promotion.
How to Use MocPOGO on iPhone for Facebook Check-Ins
Step 1 Download and install the MocPOGO iOS app on iPhone or iPad and open it.

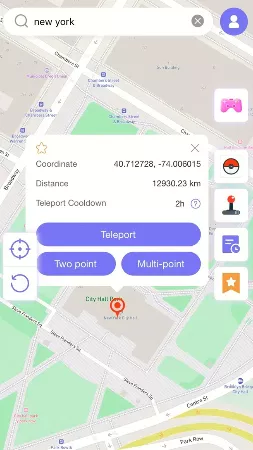
Step 2 Enter the location address or GPS coordinates in the search box and click on the search icon. The location will appear on the map. Select “Teleport” from the pop-up menu.
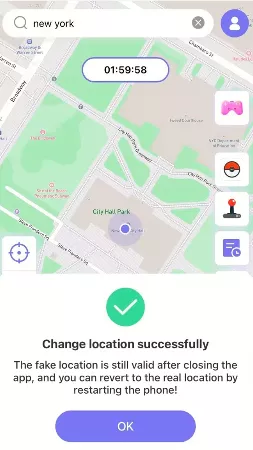
Step 3 Select “Configure VPN”, and your iPhone location will be changed within seconds.
How to Use MocPOGO on Android for Facebook Check-Ins
Step 1 Open the Google Play Store and search for MocPOGO. Download and install the app.

Step 2 Type the location address in the search box and click on “Teleport.”

Now open Facebook and create a Check-In post. Facebook will now show the virtual place as your real location.
Part 4: Pro Tips for Better Facebook Check-Ins
To get the most value from Facebook check-ins, here are some smart tips:
1. Customize Your Audience Before Posting
Don’t let everyone see where you are. Tap the audience selector and choose:
- Friends
- Specific friends
- Only Me
- Custom groups
This reduces privacy risks without stopping you from sharing memories.
2. Add a Photo for More Engagement
Posts with photos get far more attention. If you are at a restaurant, snap the dish. At a concert, capture the stage. Photos make your check-ins feel like real stories instead of simple location tags.
3. Tag Friends to Build a Shared Memory
When you tag people, it helps them relive the moment. It also helps Facebook identify the location for future visitors. You can also get more visibility in both your and their feeds.
4. Avoid Real-Time Check-Ins at Home or Familiar Spots
Never check in at:
- Your house
- Your workplace
- Your school
- Small private gatherings
Always protect your personal security.
5. Add a Caption or Story
Do not simply tag a place, add meaning:
- What brought you there?
- What did you enjoy there?
- Any funny moments or memorable details?
Human storytelling always beats silent check-ins.
Summary
Facebook check-ins are a simple way to share where you are, create memories, and stay connected with people who care about you. Checking in on Facebook will take a few minutes on the mobile app or the desktop version. Facebook Places adds accuracy by suggesting nearby locations, and tools like MocPOGO give you full control over your GPS location when Facebook struggles with accuracy or when you prefer privacy.
Muhammad Adnan is an experienced writer with 8 years of work in creating interesting and useful content in different areas. He focuses on writing clear and easy-to-understand articles, including guides, solutions, and helpful tips. With almost a decade of experience, he makes sure every article is trustworthy and easy for readers to follow, turning even complicated topics into simple and understandable content.